We know that many programs use recruiting database software to manage prospects year-round. With FastRecruit, it's simple to import
a large list of prospects that you pull from your recruiting database software at the start of the recruiting season, and export a list at the end of the season back into your recruiting software. Use this guide to help with these steps if your program uses JumpForward.
Topics:
Exporting Recruit Info from JumpForward
Importing Recruit Info into FastRecruit
Exporting Recruit Info from FastRecruit
Importing Recruit Info into JumpForward
Exporting Prospect Info from JumpForward:
1. Log-in to JumpForward
2. Click on the “Databases” tab between your “Home” and “Calendar” tabs and select “Prospects”.
3. Filter for your desired prospects by grad year, ranking, or any other criteria to pull up the correct list of prospects you're recruiting this season. Select the Recruits you want to export by clicking the checkmark next to them, or you can click the top-left checkbox to select all prospects you've filtered down to.
4. Now click “Data Export” under the Prospects tab on the left pane of the screen.
5. Enter a title for your report in the “Enter File Name” box in lower right hand corner. Next, select the fields you would like to import into FastRecruit based on what you capture in JumpForward. We recommend: First Name, Last Name, Grad Year, School Name, School City, School State, Club Team, High School Jersey #, Club Team Jersey #, Rank/Category, Position & Coach. Select your desired categories by moving them from the left box to the right box using the arrows in between the two boxes, then click “Generate Data Export”.
6. After clicking the Generate Data Export button, you will receive a message letting you know that you data is being generated and that it will be emailed to you shortly.
7. After you receive the email, be sure you are logged into JumpForward before clicking the link that says “click here to claim your file”. A blank tab/window will pop-up and your file will begin Downloading. If you are not logged into JumpForward before clicking the e-mail link, you will be redirected to sign into JumpForward, and then you must click on the link again to begin the download process.
8. Once your download is complete, open your spreadsheet in Excel (or Numbers) and save the file as a CSV file. This can be done by clicking the File menu and selecting Save As. Name your file and choose your save location (we suggest the desktop), then click the drop down menu next to "format" to choose the Comma Separated Values (.csv) option. You can now save your file.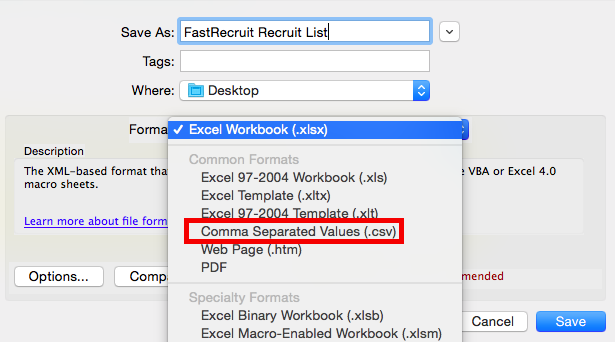
Note: If some of the information you would like imported into FastRecruit is not kept within JumpForward (e.g., Club Jersey #), you can manually add those topics within Excel (or Numbers). Be sure that you include a topic header for all of your columns in your .CSV spreadsheet.
Importing Recruit And Transfer Info into FastRecruit:
1. Log-in to the FastRecruit Web-Portal
2. Once logged-in, click on the Recruits tab, click the Bulk Actions drop down menu. Select Import

For Transfers
Once logged-in, click on the Recruits tab, click the Bulk Actions drop down menu. Select Import


4. Next, you will match up the columns in your excel spreadsheet with the available fields in FastRecruit. You can also create new fields as you import if they aren't available in FastRecruit.
In this Map Columns window, you'll see the available fields in the FastRecruit System on the right, and the fields available from Your Import File on the left. Some fields will match up automatically based on name. If needed, select the drop-down in the left-hand column and select the appropriate column from your import file that matches the FastRecruit field. At the bottom of the example below, I'm selecting Class, which is a column header in my excel sheet, to match up with Grad Year, an available field in FastRecruit.
**Note that school name, school city and school state must all be entered on the .CSV file in order for high school information to be imported.**


6. Once you've mapped all of your fields, click Next to proceed. Pay attention to any error messages noting adjustments needed to your import file.
If you receive an error message like the one below regarding duplicate recruits within your file, you must delete any duplicate entries in your spreadsheet so that each recruit has a unique name. If you happen to have two recruits with the exact same name, please add an initial to one of the recruits so that their names are not exactly the same. You DO NOT need to close out of FastRecruit to do this. Simply open up your .CSV file, make the corrections needed and save your file, then press the Next button again in FastRecruit. If all duplicates have been removed, you can continue on your way to importing your recruits.


Exporting Recruit And Transfer Info from FastRecruit:
1. Log-in to the FastRecruit Web-Portal
2. From the Recruits tab, select Bulk Actions > Export

For Transfers
From the Transfers tab, select Bulk Actions > Export

3. In the Export Recruits window, fill in the criteria based on which recruits you'd like to export.
- By entering the date you updated/edited any recruit or transfer's information in the Updated After or Updated Before field, only recruits that you've added or updated in FastRecruit during that time frame will be exported.
- By entering the date you created a recruit or transfer in the Created After or Created Before field, only recruits you've added into FastRecruit during that time frame will be exported.

4. Click Export Recruits and your .CSV file will be downloaded.
Exporting Notes
1. To export your notes, Click the Reports tab > Notes

2. Fill in filters as needed to show only notes created during certain dates, for certain recruits, or by specific staff members. Leave these filters blank to export all notes. Once you've filtered as needed, click Export Notes.

3. You'll finally be asked how to sort the notes in the excel file. You can choose to sort by recruit or by most recent. We recommend sorting by recruit if you plan on transferring these notes back into JumpForward. Once you make your selection, your .CSV file will be downloaded.


3. Click Submit a Request to begin sending your FastRecruit files to JumpForward support to make updates
4. Under the first prompt, Enter instructions here, select Coach Request Data Upload
5. In the subsequent fields that appear, please fill them out as seen below, select 'Submit' once complete. Make sure to attach both the recruits .CSV file and the notes .CSV file to the request that you previously exported from FastRecruit.

6. JumpForward Support staff will receive the request and make updates to your Prospect list in JumpForward. Please contact JumpForward support for any questions from here on turnaround time for these requests.